 Fire
tools.
Fire
tools.[Home] [Back To The Forge & Fire] [The Blacksmith's Fire] [Lighting The Fire] [Using The Fire}
Updated September 16th, 2019. Under construction, more photos to come. Previous update way back in October 30th, 2001.
Consider how the coke and coal will be moved onto the fire as it is being lit. Coke is far more easily lit than coal. As the fire grows, more and more coke will be raked onto the fire until a good clear bright fire has been established. Only after the fire is established will the 'green' coal be added around the sides of, and on top of the fire. Since coke is needed first, the blacksmith takes care to keep the fire well fueled- even if is he getting ready to quit for the day- so that a plentiful supply of coke is at hand for startup the next day. The cinders and fuel of the previous days' fire is pulled clear away from around the firepot and the firepot is cleaned out, coke is then placed around the firepot. Coal placed nearby, but out of the way of the coke until the fire is lit. Tools are picked up and put away and the smith prepares to light the fire. Below is explained the steps in getting the fire started. But first, what about the fuel?
Typically today the blacksmith buys high quality blacksmith's coal for use in the coal forge. Ready-made coke can be substituted for coal and has different burning characteristics compared with coke that the blacksmith makes directly from coal in the fire. A short explanation of coal and coke is necessary to explain the differences between coke and coal, and how and why coke is used in the blacksmith's fire.
Coke is what remains after the coal is heated and the oils and impurities are driven off or distilled out of the coal as a result of exposure to extreme heat in the fire. Coke is very light and porous in comparison to coal (roughly half the weight) and grayish black in color. Coke from good blacksmiths' coal will bind together in a mass and is very crumbly and fragile compared with coal, therefore the smith handles the fire as little as possible and avoids packing or breaking the coke unless necessary when placing work in the fire. Coke is relatively pure carbon and it is coke that provides the heat to bring the iron to incandescent temperatures necessary for forging and heat treatment of iron and other metals. Coal produces little heat of use to the smith and the impurities may be harmful to some smithing processes such as heating the iron for fire welding. This is why the blacksmith will only allow coke to enter the heart of the fire with more coal 'coking' on the top and sides of the fire to replace coke that is consumed.
Water is used to facilitate coking some types of coal. The rule
of thumb here is that if the coal crumbles into small or fine parts,
then soak the coal with water before putting the coal on the fire. And
if the coal is solid and in the form of gravel, then do not use water.
The coal seen in the photos on this page is equivalent to 3/4 inch
gravel in size. No water is used for the coal shown in the photo below.
Some types of metallurgical coal are very crumbly, and for these types
of coal, a little water helps to bind it together before and during the
coking process. Do not put water on coal after it is placed on
the fire. Any water coming into contact with a hot cast iron firepot
will break the firepot.
Fire
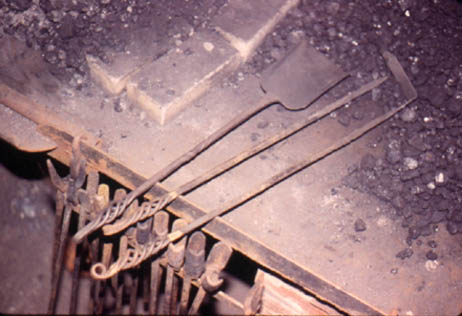
tools.Rake, shovel, and poker.
The first tools a new smith needs to acquire or make are the rake, shovel and poker. A rake should receive priority if tools must be made since the rake is used most for fire tending. A piece of iron rod can substitute for a poker until a more suitable one can be made and a coal can be laid on the fire by hand until the shovel is made. At left are an example of these tools.
The fuels are moved by use of a rake and sometimes the fire shovel. A
poker is used for opening a packed, clogged, and banked fires and for
cleaning clinker out of the fire clearing a path for the air blast from
the tuyere when clogs occur during use.
About the rake.
Most smiths have a favorite style of rake. This often has much to do with where the smith learned their trade or what region of a country the smith lived in. Some smiths prefer a rake which is formed in a circle or semi-circle shape. Some like myself prefer a 90-degree bent rake while others like an exaggerated curve in the bend of the rake. Most rakes have a tip which is formed at an angle so it can be used to break coke easily with the point of the rake. Some smiths shun the rake altogether and prefer a slice instead (see the movie Schindler's List- the smiths forming hinge parts at the factory).
Bucket and Sifter.
An iron bucket with a sifter made of expanded metal is needed to sift
out fines and separate coke from clinker during initial cleanup each
day. Expanded metal or screen with holes spaced about 5/16ths of an inch
apart is sufficient. The sifter is placed over the steel bucket in a
convenient location near the forge before use.

 remains
of the previous days fire is removed or cleaned out completely from
the fire pot. If using a forge with a side blast with a cinder bed to
support the fire, remove the old coke and coal and cinders down to
slightly below the level of the blast tube (called a tuyere). Make
sure all clinkers are removed and disposed of immediately!
remains
of the previous days fire is removed or cleaned out completely from
the fire pot. If using a forge with a side blast with a cinder bed to
support the fire, remove the old coke and coal and cinders down to
slightly below the level of the blast tube (called a tuyere). Make
sure all clinkers are removed and disposed of immediately! 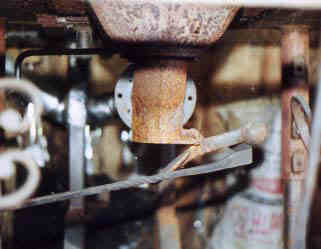 Dump
the ash gate. The ash gate is located below the firepot
tuyere. Click on the thumbnail at right. This traps fines and dust as
it sifts through the air vent at the bottom of the firepot both in use
and during cleaning. Open the ash gate to allow to dump fines or they
will collect in front of the incoming air pipe and block the air to
the tuyere.
Dump
the ash gate. The ash gate is located below the firepot
tuyere. Click on the thumbnail at right. This traps fines and dust as
it sifts through the air vent at the bottom of the firepot both in use
and during cleaning. Open the ash gate to allow to dump fines or they
will collect in front of the incoming air pipe and block the air to
the tuyere.
That's it. The fire is lit. For beginners this is a good place to stop
and go try it. More discussion of good fire tending is on the next page
Using the Fire and details working with and maintaining the fire for
use.
The Torch Method
Professional ornamental iron shops often use an acetylene or propane/natural gas torch to light their coal forges. The torch method is much faster and easier than using newspaper or kindling. The torch method and the alternative method below are the only methods that can be used on forges for the air blast cannot be controlled.
Oxy-Acetylene, Oxy -Propane, and city gas and oxygen torches with rosebud tips work best. If using a propane torch it's best to use a torch with a flexible hose because the torches that attach directly to the top of a small propane tank require the tank to be upended to aim the flame down on the coke to light the fire, and this causes poor performance of that type of torch.


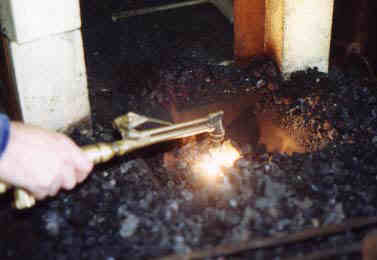
With the firepot cleaned out as explained above, place some coke back in the bottom of the fire pot about 2 or 3 inches deep. The coke is then heated with the torch until an area about the size of a man's fist is glowing red while at the same time the smith begins operating the blower or bellows. The torch is set aside and the glowing coke is covered with more coke several inches deep. There is no danger of the fire being blown out accidentally as though lighting with kindling, so the air blast is turned on full. A full air blast will immediately heat the burning coke at the bottom of the fire. In a few minutes the fire will be burning strongly enough to add the rest of the fuel. The air blast is continued for another couple minutes until the fire is burning hot and then the blast can be turned off. That's it. The fire is lit.
An alternative fire starting method
Here is a quick method of starting forge fires from a single source of flame. This works fast like the torch method and is good for starting fires in a group of forges when little kindling is available.
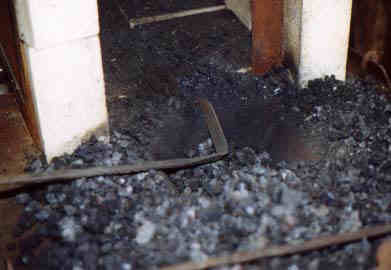
The fire pots of the unlit forges are cleaned out and prepared as for any other method. The smith then goes to an established fire whether it is a coal forge, campfire, or other fire source, and takes a shovel full of burning red-hot coals. The burning coals are then dropped into the bottom of the fire pot of the forge being lit. A thick layer of clean coke is raked over the burning coals about 2 or 3 inches deep and a full blast of air turned on. Within a minute flames will be coming through the fire and the rest of the fuel is raked over the fire. Continue the air blast to encourage the fire to grow until sufficiently large enough that the fire will remain lit on its own. That's it. The fire is lit.
WARNING! Playing with fire and hot iron is DANGEROUS! You will get hurt. You will get burned. You will burn your shop or home if you do not pay attention and use good personal judgment. This is a very hazardous occupation whether a hobby or profession. For those unwilling or too incompetent to use good personal judgment or who are accident prone, it is in your best interest to find another occupation. You are warned.
Updated October 30th, 2001.
All pictures are originals by the author.
The author can be emailed at address in picture below:

Original publish date December 30th, 1999.