
[Home] [Back to Ironwork & Metalwork page] [Iron & Copper Entryway Gate] [Beautiful Fountain, Nurenburg Germany] [Modern Brass & Glass Railing] [Baroque Drive Gate Reproduction]
16 September, 2019
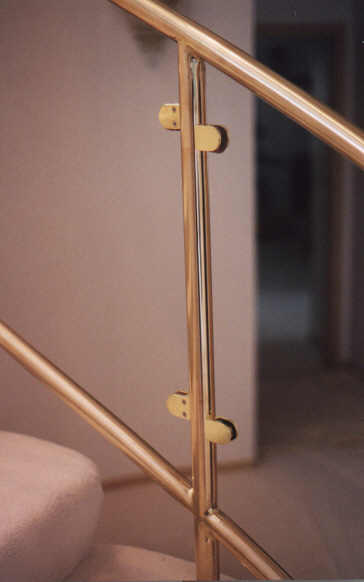
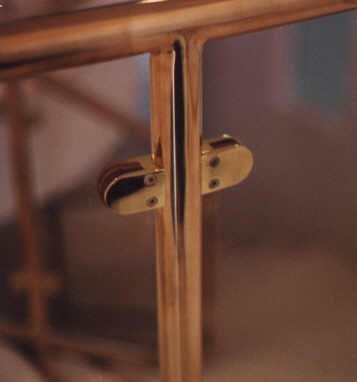
Here are some photos of the modern style brass railing I built over the past months. Polished to a mirror finish, welded joints, brackets fastened to the posts support clear glass panels that will be made by another company. The railing was completed July 25th, 2003.
The stair treads were all of differing lengths and the stairway curves in an 'S' pattern. This made bending somewhat difficult and we decided to follow the overall incline direction when bending the railings to avoid creating 'humps' in the rail where the grade varied.
Click on the thumbnail photos to see the larger view.


A crude pipe polisher consisting of a Flex Tools polishing machine with a rubber drive roller and felt belts was used for all scuffing and polishing operations. In addition to the Flex machine, we used a 4-1/2" side grinder equipped with the 'Hook & Loop' system Scotchbrite pads and felt polishing pads. We also used a hand held 'flexible shaft' machine that consists of a motor mounted to the bottom half of an office chair legs and wheels, and a flexible shaft 5' long and cotton buffing wheel. This pipe polishing method can't get into the joints of the welds in some cases and leaves obvious differences in the polished area above the tops of each post joint. If I had to do it all over again, I would invest in the new style polishers and pipe sanders/polishers made by Fein Tools http://www.fein.de/ or by Poly-Romy http://www.poly-romy.ch/en/ .
The U.S. vendor page with the pipe polishers (Rohrschleifer RS 12-70 E) is here: http://www.feinus.com/p/stainless/stainlessmain.htm , and RS 12-70 E is shown here: http://www.feinus.com/p/stainless/rs.htm .
Poly-Romy pipe polisher page is here: http://www.poly-romy.ch/en/ .


The crude old style method of polishing with a belt and drive wheel proved slow and awkward. The 'T' end of the T-slot connection on the felt polishing belt required stiffening to prevent it from collapsing and pulling apart, and this involved a preplanned treatment of the 'T' end of the belt during which we painted the 'T' end of the connection and left it to dry for an afternoon. The paint would soak into the felt material and dry slowly. The belts are supplied 3 to a package and all must be treated the night before use as they break at the 'T' part of the belt within a couple hours of use. Repaired immediately so that there was always a belt available for use.
The polisher is a little bit heavier than a 4-1/2" grinder. The polisher must be held out at arms length much of the time during use and puts a tremendous strain on a smiths back. A special crane was built that swiveled and supported the weight of the polishing machine by a small rope and pulley system with a counterweight at one end and a snap at the other that fastened to a special home-made bracket on the polishing machine. The crane and pulley system looked silly in use but it saved my back for hours upon hours of continuous use. Without the crane and pulley system I would not have lasted 10 minutes with the polisher.


The Scotchbrite belts and sanding belts are cut apart at the joint and looped around the pipe railing and finally rejoined with tape. The method of taping the joint is critical as only a good job of applying tape will last long enough to do the job. While the Scotchbrite belts are made of the same Hook & Loop material as the disks for the side grinders, they cannot be secured with Velcro backing. I know because I tried using Velcro to secure the belts and the Velcro didn't last a single revolution of the belt. Tape was the only method that worked. I used a combination of duct tape and string-embedded strapping tape. The duct tape is supplied in roles approximately 2" in width and the belts are 1-5/8". To fit the tape to the belt without causing the tape to overlap the sides of the belt, a narrow strip approximately 1/2" wide was torn off the role and discarded, leaving a strip approximately 1-1/2" in width that was then used to connect the Scotchbrite belt. Beginning with a short strip to make the initial connection to hold the belt together at the connection, the remainder of the long piece of tape (left on the role for easier handling) was then wrapped around the entire length of the belt. Careful to avoid allowing any tape to extend over the edges of the belt. The strapping tape was then applied around the outside of the duct tape. The duct tape was much more 'sticky' then the strapping tape so it provided a good grip on the belt while the strapping tape prevented most of the stretching that would occur as the belt heated during use. The belts get hot in use! When the belts heat during use, the glue on the tape melts and the tape stretches- exposing the glue of the duct tape inside the joint area of the belt. The taped belt would last approximately 5 minutes before requiring the old tape to be stripped off and the belt re-taped. Fortunately it takes only a few minutes to scuff each section of pipe. The whole process is very, very slow.
Note to other smiths trying this method of polishing! It is very important to trim away the excess tape that is used to make the initial connection of the Scotchbrite belt. Care must be taken to prevent any duct tape from coming into contact with the surface of the pipe being polished. The friction caused by polishing heats both the pipe and the polishing belts. The glue on the tape will melt and stick to the pipe and cause a big mess. The glue that clings to the pipe will then be picked up by the abrasive surface of the belt and clog the pores of the belt, leaving it useless. To extend the life of the abrasive and polishing belts be sure to trim all tape away from the edges of the belts and change the tape as soon as it begins to stretch or the taped joints begins to expose the glue side of the tape. Also avoid operating the belts over surfaces with tape-glue or polishing compound residue on the surface. Tape-glue and polishing compound can be removed with a rag dipped in lacquer thinner and the lacquer thinner wiped off.
Brass railings like this one require tremendous amounts of time to build. I would caution anyone contemplating the building of one of these rails to avoid it altogether. It takes about 6 times longer to build one of these rails compared with a steel railing. Charge accordingly or you will lose a large amount of money.
Latest update September 16, 2019.
Page created July 28th, 2003.