Brake Drum Forges Are JUNK!
Good blacksmith's don't use brake drums in
their forges. Take the hint.
[Home] [Back
To The Forge Design] [Blowers,
Bellows, Firepots, & Hearths] [Forge
Bellows] [Chimneys]
[Steel Hoods] [Side
Blast Forge Tuyeres] [Tools
Racks & Storage] [Styles
Of Forges] [Planning
Layout of Hearth]
[Steel
Side-draft Forge and Hood Plans] [Brake
Drum Forges] [Costs
To Build]
 A
brake drum forge is the poorest and most awkward and impractical design. I do
not recommend brake drum forges to anyone. More convenient and effective is to throw the brake drum away
and simply dig a hole in the ground with a 2 inch pipe angled into the side of the
hole to supply air. Anything would work better than a brake drum- a box filled
with dirt or clay with a hollow depression for the fire, a flat surface made of
stone or steel with a pile of cinders creating a depression for the fire. Anything
but a brake drum. Brake drums were meant for use on cars and trucks- not in a
blacksmith's forge.
A
brake drum forge is the poorest and most awkward and impractical design. I do
not recommend brake drum forges to anyone. More convenient and effective is to throw the brake drum away
and simply dig a hole in the ground with a 2 inch pipe angled into the side of the
hole to supply air. Anything would work better than a brake drum- a box filled
with dirt or clay with a hollow depression for the fire, a flat surface made of
stone or steel with a pile of cinders creating a depression for the fire. Anything
but a brake drum. Brake drums were meant for use on cars and trucks- not in a
blacksmith's forge.
Latest update:
29 September, 2019.
Who recommends brake drum forges and why?
Many blacksmith websites are run by (and for) hobby smiths posing as masters
or experienced blacksmiths. Most 'experienced' hobby smiths on the internet forums are unanimous in pushing the beginner to start
with a brake drum forge. The brake drum people always claim to have years of
experience using brake drum forges on a daily basis and making lots of money
doing the best work using their brake drum forges. They would have the beginner believe that a 'brake drum'
forge and a cheap hair dryer are a good substitute for a real blacksmiths
bottom blast forge and blower. Many of these hobby websites have a slick
'professional' web design appearance that causes the newbie to think he or she is
getting the best advice. Any newcomer that dares to question the use of a brake
drums in forge design, is immediately and brutally attacked and humiliated until
he/she submits or goes away.
The brake drum masters don't have anywhere near as much experience as they
claim using brake drum forges. They get very little money for anything they
produce with a brake drum forge and they produce very little ironwork anyway. Take
a look at photos of their work (if they even provide any). The work done with a
brake drum forge is always of the simplest design and lowest quality - usually 'S'
hooks and railroad spike knives, lots and lots of knives. The problem with knives
is that over 90% of the work to make a knife involves grinding and sanding and
polishing. So if the brake drum pusher actually has photos, look for photos of
their favorite sander or grinder. The sanders and grinders take up a very
prominent place in the knife grinder's shop. Grinding and sanding equipment plays
a huge role in the knife grinder's work, but not in the blacksmith's work. Also
take a quick look at some of the date stamps on these peoples' posts, and it will
be apparent that most of these people are on the internet day and night - not
working in their shops as blacksmiths. These wannabe experts are in fact,
inexperienced and unskilled, and they are giving the newcomer advice on how to
build the most important tool in the blacksmith's shop! Do you see a problem here?
Real working blacksmiths don't tell newcomers to build brake drum forges! They
tell the newbie to learn how the best forges work and to build something that
functions much like the professional blacksmith's forge. Think about it.
The brake drum pushers refuse to use brake drums in their own forges.
That's right! Despite their own advice urging beginners to use brake drum forges,
the owners of those slick hobby smith websites, along with their forum
participants, have chosen to use gas forges or coal forges with homemade or
commercially made firepots. Beginners should question this contradictory
philosophy. Why do these 'experienced' smiths choose not to use brake drum forges
themselves? Do you see a problem here? No professional smith would ever use a
brake drum forge - it is easier to build a high quality forge from wood, steel,
brick, concrete, clay, dirt, stone, etc. But now we discover that even the brake
drum pushers refuse to use their own brake drum forges. Why? If the brake drum
forge is so great, then why do these alleged experts refuse to use them?
What are the typical reasons for pushing beginners into a brake drum forge?
They usually go something like this:
- Because the beginner just wants to try his/her hand at the blacksmith's
craft to find if they want to pursue the craft further, and
- because the beginner doesn't a lot of money to buy a lot of expensive tools
to start blacksmithing,
To the beginner or non-smith, their concerns might at first appear well
intentioned, but their argument for using a brake drum forge are poorly
thought out and are often abusive and condescending towards the new smith - almost
as though the 'experienced' smith might actually be trying to force the beginner
to use a brake drum forge as if it were some kind of hazing or occult initiation.
The central theme of their arguments pretends to focus on cost of building a
forge. They often point to a beginner's ability to obtain a brake drum for 'free'.
But as I would argue, a 'free' object that is ill-suited for a task (such as using
a brake drum instead of a properly designed firepot), usually ends up costing more
to work with than if one were to simply pay full cost of a homemade or
commercially made object that was made specifically for the blacksmith. In other
words, that free brake drum will end end up costing more time and money than a
commercially made cast iron firepot or homemade fabricated steel firepot.
The usual target of a brake drum forge is the person that 'doesn't want to
spend a lot of money'. But cheapskates generally have few tools of any real
quality and these people generally have no skills with which to use them. To make
a brake drum fit into a forge hearth and work well, requires a substantial cash
outlay to purchase the necessary tools and materials. And these people don't have
the necessary skills with which to do the work. Trying to install an incompatible
piece of junk like a brake drum fit into a forge, is difficult even for the
experienced craftsman. Would it not also be easier AND cheaper for an unskilled
workman to fashion a forge from wood and clay and dirt and stone, instead of
trying to make a brake drum conform to shape? Aren't those materials 'free' too?
The gently sloping sides of the ducks nest (the hollow area that supports the
actual fire) are easily formed in clay or fire cement. This is done without a
brake drum. Using alternative construction materials such as clay or fire cement
would not require welding skills, screws and hardware, or expensive electric
tools. So why not these other materials to build the beginner's first forge? These
alternate materials would produce a much better forge for the blacksmith, so why
do these supposed experts insist on pushing the beginner towards a poorly thought
out brake drum forge - knowing that the brake drum forge performs so poorly, that
the beginner will soon be forced to build a better forge soon afterwards? Why not
save the effort and just do it properly the first time?
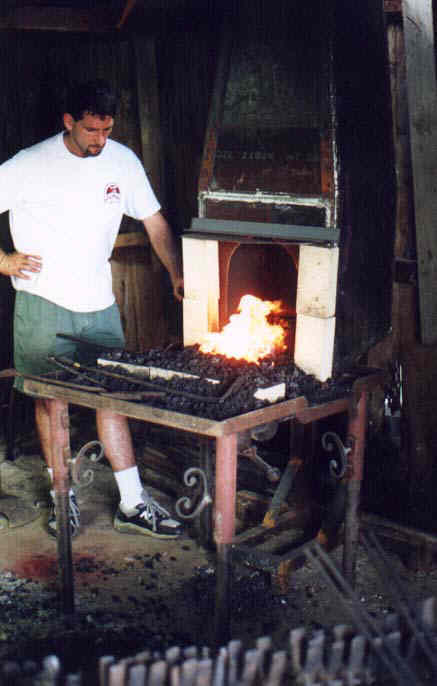
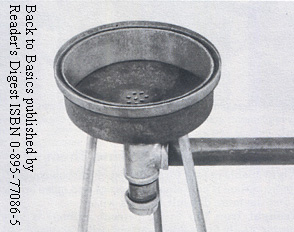
What's wrong with the picture at right?
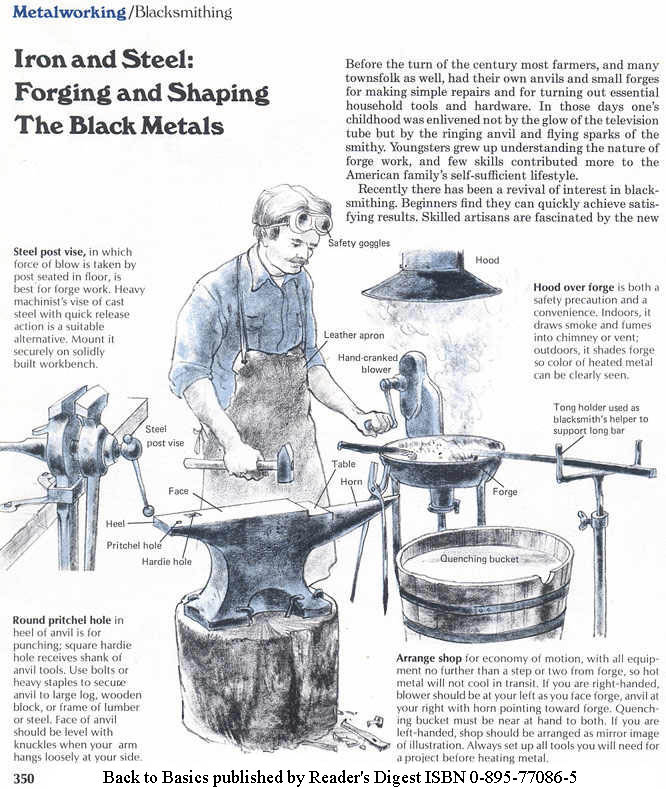 The
fire is not depicted in a realistic manner. The sides of this forge (Reader's
Digest illustration at right) would be roughly 3 inches tall and similar in size
to the rim of a brake drum. This picture shows two iron bars roasting over the
fire and everything is comfortably maintained in the tiny little hearth. It looks
like the smith is simply bar-b-queuing the iron over a low bed of charcoal.
The
fire is not depicted in a realistic manner. The sides of this forge (Reader's
Digest illustration at right) would be roughly 3 inches tall and similar in size
to the rim of a brake drum. This picture shows two iron bars roasting over the
fire and everything is comfortably maintained in the tiny little hearth. It looks
like the smith is simply bar-b-queuing the iron over a low bed of charcoal.
In reality the typical blacksmith's fire is roughly 7 inches or more in
depth and fuel would tower over the sides of this little forge. And every time the smith adjusted the fire or moved the iron into or out of the
fire, fuel would spill all over the floor to be wasted.
Most pictures (like the illustration at right) fail to show proper use of
the blacksmith's fire because they were not drawn by blacksmiths, they were
instead drawn by a book illustrator. It's a beautiful illustration but it just
isn't accurate. The depiction should have shown the iron thrust into the heart of
a deeper fire, not roasting above a low bed of coals.
Fuel spills off the brake drum and all over the ground (wasting valuable
time and fuel) whenever long tools or iron bars are placed on the brake drum
forge. This is annoying and unsafe. When coal is added to the fire on a brake
drum, the beginner must be careful to add only a little at a time and place it
slowly for fear that much of it will fall off the forge if he puts it on the fire
too quickly. Fire tools cannot be placed conveniently nearby the fire because
there is nowhere to put them on a brake drum forge hearth, that they won't fall
off. Some hobby smiths like to claim that they make a tool rack to hang their fire
tools from, but this is awkward- almost like having to pick them up off the
ground.
Tongs and other tools cannot be hung from the horn of an anvil like the
illustration above depicts, because tongs get very hot and the smith must bend
down to grasp the handles of the tongs to avoid getting burned- using valuable
time while the iron is wasting away in the fire or cooling in the air. The brake drum forge
hearth offers no convenient location to lay hot tools when they are not in use -
thus the reason that the artist depicts tongs hung from the anvil horn.
Note that the forge depicted (in the illustration) is a
small 'riveters' forge. We can use this depiction to discuss the brake drum forge
because the riveter's forge is identical in size and shape to a brake drum forge.
Fire depth. Now immediately the hobby smiths on
the forums are going to attack the idea that a blacksmith's fire must be at least
7 inches (180 mm.) or more in depth. So let's look at some proof in photos of
forges in blacksmith's shop. Click on the photos below to enlarge them.
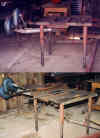
One of the firepots in the photo below is the Centaur Vulcan that this author
has used in 3 different forges since 1981. The coal is piled on top of the
firebrick to a depth of about 1-1/2 inches (40 mm.). The brick is roughly 2-3/4
inches (72 mm.) tall. The depth of the firepot below the brick is roughly 3
inches (80 mm.). Total fire depth is 7 to 8 inches (180-200 mm.). This is a
typical fire for general blacksmithing work.
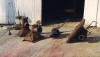 Photo
(near right) shows a selection of firepots - note the Centaur Vulcan firepot
second from left.
Photo
(near right) shows a selection of firepots - note the Centaur Vulcan firepot
second from left.
Photo (at middle right) shows the Centaur Vulcan pot installed in a new steel
forge.
Photo (far right) shows the new steel forge from the middle photo, in use. Coal
and coke are seen piled over the height of the firebrick near the firepot. The
fire can be seen to be around 7 inches (180 mm.) depth.
The Beautiful Iron blacksmith website contains literally hundreds of photos of
blacksmiths working with properly designed forges. I encourage newbies to take a
look at the fires on the Coal Forge pages and see for themselves how blacksmiths
maintain their fires. All professional and semi-pro (amateur) blacksmiths handle
their coal forge fires in the same way. In fact, fire tending skills are so
important in the blacksmiths' work that we can actually determine whether a
blacksmith is a professional/amateur, or just a hobbyist, simply by watching the
way they maintain and use their fires. Take a look at the blacksmiths at the
Harvey Yellin Memorial gate smithing workshop on this YouTube video-
http://www.youtube.com/watch?v=v_IUu0t9su0 and here
http://www.youtube.com/watch?v=BTmq0y8UZNE and here
http://www.youtube.com/watch?v=0viHnqB0wW4 .
The case against the brake drum forge.
- Too small for use as a forge hearth, and too large for use as a firepot.
The brake drum of a car or truck is too small to make a forge hearth. A good
forge hearth requires much more room to support the coal and coke that is placed
in and around the fire. The brake drum is simply too small for this. It is
possible to fabricate a hearth around the brake drum to try to extend the
surface of the hearth area but this is much more work compared with using a
custom designed forge with firepot or side-blast tuyere. The brake drum of a
truck wheel is too deep and a smith would need to cut a lot of the sides of the
brake drum to gain access to the heart of the fire for long bars. This is a lot
work with expensive tools. If the smith doesn't already own lots of tools, then
using a brake drum will actually mean a substantial investment in tools to
modify the brake drum- money that could otherwise have been spent on a
manufactured firepot and construction materials anyway!
- Too large for use as a firepot. At the same time it is also too large
for convenient and efficient use as a firepot. The sides are made at a 90-degree
angle to the bottom (side) of the brake drum and will snag at the fire rake each
time the smith maintains the fire with the rake.
- Center hole in the brake drum must be covered. The brake drum forge
requires a plate to cover the center hole with air holes punched or drilled into
it to allow the passage of blast air. The air holes clog with debris
during fire use and require a lot of effort to clear individual air holes with a
poker. The poker snags on the edges of the holes and this makes clearing the
blast holes awkward and frustrating. Clinkers adhere readily to the homemade
steel plate covering the center hole of a brake drum. By contrast, a ready-made
firepot uses a rotating cast iron clinker breaker to loosen clinker and clear
the debris from the air blast hole, and clinkers have less tendency to adhere to
the cast iron parts of a manufactured clinker breaker. The small cover plates
sold by Centaur Forge may fit some brake drums but again this costs more money,-
money that could otherwise have been spent on a manufactured firepot or tuyere.
- Brake drums are awkward to modify for forge use. The brake drum is
made of cast iron and because it does not already conform to a convenient shape
for use as a firepot, it is therefore difficult to use as a component in the
construction of a forge. While it is very desirable to use a cast iron firepot
due to the excellent anti-corrosion properties of cast iron when exposed to high
heat, the ready-made firepots are of a suitable shape and design for use in
forge construction while the brake drum is not. The manufactured firepots and
tuyeres have mounting flanges cast into their form to facilitate mounting in a
custom built forge. Anyone building a brake drum forge must spend additional
time and materials to build supports to mount the brake drum into their forges,-
time and money that would otherwise have been spent on a firepot or tuyere.
- The brake drum still requires a tuyere. A tuyere is the part of the
air delivery plumbing closest to the fire. Note here for beginners that I keep
talking about firepots and tuyeres separately. This is because most American
smiths use bottom blast firepots with tuyeres mounted underneath. Smiths in
other countries may use a sideblast style forge in which the air blast comes
into the fire from the side rather than the bottom. The sideblast style forges
use only a tuyere while the bottom blast fires use a firepot with a tuyere
attached to the bottom. When discussing the construction of brake drum forges it
is assumed that the smith intends to use the brake drum as a firepot. Keep in
mind that the brake drum was designed for use as a part of a braking system for
a car, not for use as a firepot. Consequently the brake drum has no means for
mounting a tuyere assembly and clinker breaker or other air valve. These parts
would still need to be added. Clinker breakers and tuyeres come ready-made with
a firepot and are not needed at all with a sideblast style tuyere.
- There is no cost savings with using a brake drum. As stated in the
previous arguments above, a new smith may think he is saving money by using a
'free' brake drum from a junk yard compared with buying a $300 firepot (was
US$270 in December 2010). But, the
money that a new smith thought he saved by [not buying] a firepot, must instead
still be spent on additional tools and materials needed to try to make the brake
drum forge fit together. The new smith that has yet to build a forge cannot know
the true costs of construction. If he blunders along with the brake drum forge,
he will find afterwards that his costs would have been the same as if he built
with a ready-made firepot, and then he must start over at now double the price.
http://www.centaurforge.com/Firebowls-Firepots-Replacement-Parts/products/168/
- Frustrating problems caused by poor design. New smiths need to
understand that coal forges require constant attention with rake and poker to
maintain a working fire. Any holes or sharp angles that snag against the rake or
poker will cause a great deal of frustration while maintaining the fire, and
will make the work so aggravating that after a while the smith will lose
interest in the blacksmiths craft. The holes drilled in the center grate (the
holes that allow the air blast to enter the fire) and the steep angular sides of
the brake drum, will only lead to continuous frustration - causing the smith to
avoid proper fire tending methods.
Advantages of a ready-made cast iron firepot in a bottom blast forge:
The advantages below apply only to coal forges with a bottom blast design. This
does not suggest that side blast forges are in any way, inferior to bottom blast
forges- they aren't. This is simply a comparison of two bottom blast style forges;
the brake drum forge vs. the properly designed firepot and tuyere.
- The firepot was designed to be the right size. A ready-made firepot
is of a sufficient size to support the fire and to allow fire tools to be used
against the sloping sides while avoiding the snagging of fire tools during
routine fire maintenance.
- The firepot comes ready-made and can be used with only minor assembly
(bolting a few ready-made parts together) right out of the box. By contrast, a
brake drum requires a great deal of time and effort to put a tuyere and other
parts on for use as a forge firepot. The firepot is designed to be quickly added
to a forge. Side flanges on firepots allow them be hung in the middle of the
forge hearth. Insert air delivery plumbing and you are ready to light the fire.
- The tuyeres are designed specifically for forge use. The tuyere of a
firepot assembly is designed to make the air converge in the heart of the
firepot. A brake drum with a 'T' pipe welded or bolted to it cannot reproduce
this design and consequently the brake drum cannot produce a fire as hot as the
fire in a good ready-made firepot.
- Clinker breakers are designed for use with firepot. The cast iron
clinker breaker in the ready-made firepot helps direct air flow to allow it to
converge in the heart of the firepot while also helpful in loosening clinkers
for removal and helping to clear clogged air passage during routine fire
maintenance. The clinker breaker requires only quick minor assembly to install -
inserting the preformed rod into the tuyere through the clinker breaker and
fastened with a screw.
- Firepots support the fire at the proper depth. The ready-made firepot
(example; Centaur Vulcan firepots made by Centaur Forge) are of sufficient depth
to allow the heart of the fire to be centered level with the sides of the
firepot and hearth.
- Relatively inexpensive. Ready-made firepots are relatively
inexpensive at approximately $260-270 for a complete ready-made pot from Centaur
Forge (Centaur Vulcan).
- Easy to use. With the fire lit, the clinker breaker rod allows easy
break up of clogs at the tuyere hole and loosens clinker, sloped sides allow the
rake and poker to be used comfortably without snagging. Air is delivered in a
way that forces it to converge in the center of the pot approximately 2 inches
above the tuyere and the heart of the fire is very hot.
How can I try blacksmithing without spending a lot of money?
- Enroll in a blacksmith class for beginners. (this section to be
updated and corrected for grammar soon)You will have access to forges that have
already been set up and in use. You will have a teacher helping you begin
forging some simple items, and you will have exposure and access to many of the
tools of the blacksmith. The classes will offer you the chance to see if you
really want to continue with blacksmithing without the need to spend large
amounts of money up front to purchase the expensive tools yourself. Many Living
History or open air style museums offer blacksmithing classes in addition to
their museum demonstrations. Check with a museum near you. Many craft schools
offer blacksmithing classes. I have placed links to some of these crafts schools
under the heading 'Schools and Seminars Teaching Blacksmithing' on my Links page
at:
http://www.beautifuliron.com/links.htm
- Visit a museum to watch a blacksmith demonstrating the old crafts.
Living History museums and other open air museums offer live blacksmithing
demonstrations as part of their display. Some of these smiths are little more
than paid beginners. At the same time many are experts that are involved in
training an entire new generation just like the master smiths did more than a
century ago. I have placed links to some larger Living History museums at
http://www.beautifuliron.com/links.htm and many more can be found by looking
up the Association for Living History, Farm and
Agricultural Museums at:
http://www.alhfam.org/.
- Visit an ornamental iron business that forges their own ironwork.
Many of these shops use some blacksmithing techniques to build ironwork and some
shops in larger cities specialize in forged ironwork. Many professional shops
will allow you a short visit to watch some of their work and some will even have
suggestions to help you get started. Search key words: Ornamental Iron, Ironwork,
Gates or Railings, Stairways or similar listings.
- Attend a blacksmith's meet or convention to watch other smiths
demonstrating their work. There are a large number of blacksmith clubs or
'chapters' throughout the United States and in England and Europe. In the US try looking up the local
chapters listed on the A.B.A.N.A. website here:
http://www.abana.org/affiliates/affiliate_map.shtml . These association chapters often have
meetings and weekend demonstrations during which they give live working
demonstrations and instruction and trade blacksmith tools.
The
blacksmith's trade is very expensive and will remain expensive for a very long
time. Building 'cheap' equipment will actually cost more money in the long run
compared with paying for the best equipment in the beginning. Remember that if you
invest in cheap junk equipment then you will be purchasing equipment twice- once
when you bought the cheap lower quality stuff, and again when you purchase the
higher quality tools because the cheaper stuff didn't perform well enough.
My own advice to beginning blacksmiths:
The first thing visitors notice about the Beautiful Iron website, is that there are no 'brake
drum forges' anywhere in the coal forge pages.
Enroll in a blacksmithing class near you. The blacksmithing class must
be taught by an experienced blacksmith. Avoid learning from other beginners
(the blind leading the blind). In a good class environment the beginner will have
the best opportunity to learn fire maintenance, heating the iron, and get to try
out a good forge for themselves. The class experience will give the beginner an
opportunity to learn if they would like to continue the craft of blacksmithing and
find out what it is like to work with good equipment. Learn how to use a good high
quality forge BEFORE building your own forge.
If the beginner wants to start by jumping directly into smithing on his own
then I recommend he/she buys good equipment. The best tools are the cheapest by
far in the long run. So you say you don't have a lot of money? Then start saving
money. Get a job. This craft is very expensive.
Buy a good cast iron firepot or side-blast tuyere from a blacksmith supplier
such as Centaur Forge or Baker House Group. It is possible to make a good firepot
from scrap steel but the cast iron firepots and tuyeres offer excellent
performance. Check out your local scrap yard for scrap steel but be ready to buy
new steel when they don't have some of the things you need. Buy a new anvil- they
are cheaper than overpriced worn out used anvils. Buy new Peddinghaus brand
hammers. Buy some 5/8ths round, 3/4ths round steel new and learn to make your own
light tongs. Buy the book The Blacksmith's Craft by CoSIRA or RDC and
modify their method for tongs making using your lighter materials. Buy a 5 inch
leg vise- make sure the jaws are in good shape, not misaligned or worn out. Buy
good blacksmith's coal, not the cheap stoker coal. Stoker coal is full of
clinkers. Buy a large forge blower. Not the tiny blowers. Don't buy the
tiny portable forges. Attend some seminars and see other smiths working and get
some ideas for your own work. Attend a horseshoeing school that specializes in
forging hand made horseshoes. Make your own rake, shovel, and poker, and make a
nicer set of fire tools a year later.
Latest update on:
29 September, 2019.
An article concerning the easiest way for teenagers with little
money to get a good start at blacksmithing will be added to this website in the
near future and links to that article after it is ready.
Page created on November 24th, 2003.