
[Home] [Back To The Forge Design] [Blowers, Bellows, Firepots, & Hearths] [Forge Bellows] [Chimneys] [Steel Hoods] [Side Blast Forge Tuyeres] [Tools Racks & Storage] [Styles Of Forges] [Planning Layout of Hearth] [Steel Side-draft Forge and Hood Plans] [Brake Drum Forges] [Costs To Build]
UPDATE September 16th, 2019. This page is too long. I will shorten it to make this page into a quick overview of different styles of forges, mostly photos. And then stop there.
 Medieval
forges seen in manuscripts and wood cuts are often of an enclosed style with 3
walls built around the hearth. Small or large depending on the shop and work done
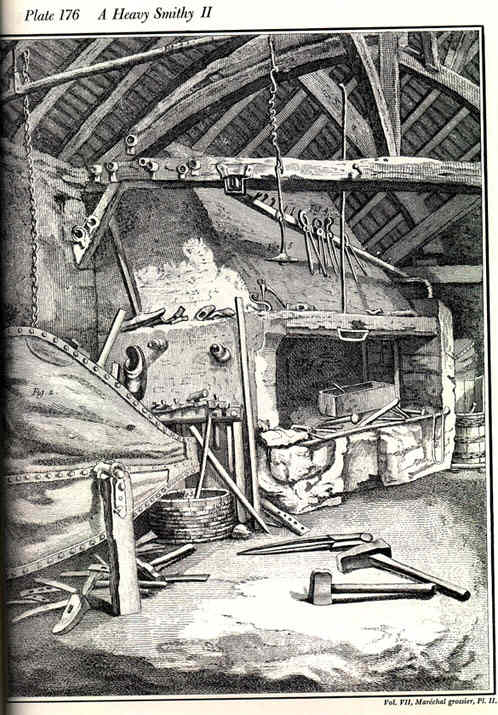
and the number of fires and smiths using it. The thumbnailed scanned picture at
far left comes from the Diderot Pictorial Encyclopedia of Trades and Industry. It
shows an enclosed medieval style forge from at least the 18th century. Side note:
most of the bellows seen in Diderot's engravings are of double acting (two-stage)
great bellows. The remaining thumbnailed pictures at left of this paragraph are
from the Technical or Science museum in Vienna Austria showing a medieval smithy
display with an enclosed forge, great bellows, and 3 water powered trip hammers
(one large hammer at left side and two small hammers side-by-side at the right).
To see the full series of pictures from the Vienna Technical Museum go here:
http://www.beautifuliron.com/cf_Vienna_TechMuseum.htm .
Medieval
forges seen in manuscripts and wood cuts are often of an enclosed style with 3
walls built around the hearth. Small or large depending on the shop and work done
and the number of fires and smiths using it. The thumbnailed scanned picture at
far left comes from the Diderot Pictorial Encyclopedia of Trades and Industry. It
shows an enclosed medieval style forge from at least the 18th century. Side note:
most of the bellows seen in Diderot's engravings are of double acting (two-stage)
great bellows. The remaining thumbnailed pictures at left of this paragraph are
from the Technical or Science museum in Vienna Austria showing a medieval smithy
display with an enclosed forge, great bellows, and 3 water powered trip hammers
(one large hammer at left side and two small hammers side-by-side at the right).
To see the full series of pictures from the Vienna Technical Museum go here:
http://www.beautifuliron.com/cf_Vienna_TechMuseum.htm .
September 29, 2019. Under construction. This page is undergoing a large rewrite (as are most of the Forge Design series) and more material will be added and pages will be cleaned up for easier reading and faster downloading as I have time to make the changes. New pictures and drawings of medieval forges will be added to this section later.
Usually made of brick or stone, the hearth of the forge was often built at a height convenient for the smith. 3 walls around the hearth tend to prevent the smoke from being blown into the shop by drafts or wind. Nice to work with and makes for a warm cozy shop environment in winter, however it is difficult to handle long bars in an enclosed forge. The 3 hearth walls keep fuel contained in the hearth with only minor effort and helps promote a cleaner shop floor. The forge can have a square interior area or have walls that taper in from front to back ( wide in front to narrow in the rear ) similar to the enclosed forge in the Dean shop at Colonial Williamsburg shown in the thumbnail photo lower down this page.
 The
hood of the forge is built at whatever level is convenient for the smith as well,
taking care to place the front at a level that does not interfere with tending
fire or placing metal in and out of the fire. In the photo of the Colonial
Williamsburg forge at left, the hood is about level with the smiths forehead. A
lintel bar supports the front of the brick hood. In this case the lintel bar is a
wooden beam. Smoke draws extra air with it into the chimney flue so the flue is a
larger size than other forge chimney flues. The picture of the hooded forge from
the Diderot Encyclopedia of Trades shows a similar forge to the Colonial
Williamsburg forge but on a much larger scale. The photos here give a hint as to
the size of work that can be done in this type of forge. Some smiths cut a hole in
the backs of the rear wall or hood to accommodate long bars. This is still awkward
in this type of forge but when long bars are only encountered occasionally, this
would work just fine. A brick or stone can then be placed over the hole to block
drafts.
The
hood of the forge is built at whatever level is convenient for the smith as well,
taking care to place the front at a level that does not interfere with tending
fire or placing metal in and out of the fire. In the photo of the Colonial
Williamsburg forge at left, the hood is about level with the smiths forehead. A
lintel bar supports the front of the brick hood. In this case the lintel bar is a
wooden beam. Smoke draws extra air with it into the chimney flue so the flue is a
larger size than other forge chimney flues. The picture of the hooded forge from
the Diderot Encyclopedia of Trades shows a similar forge to the Colonial
Williamsburg forge but on a much larger scale. The photos here give a hint as to
the size of work that can be done in this type of forge. Some smiths cut a hole in
the backs of the rear wall or hood to accommodate long bars. This is still awkward
in this type of forge but when long bars are only encountered occasionally, this
would work just fine. A brick or stone can then be placed over the hole to block
drafts.
Tools are often hung on the front or the forge but the beginner needs to be careful of what the interpret here in the photos; the tongs are off to either side or just to one side of the fire. Tongs are never hung in a position that would cause the smith to reach over them to move metal in and out of the fire. Look carefully in the photos to see this. In both the photos from the Dean Shop at Colonial Williamsburg (thumbnail above) the fire is in the middle of this forge and tongs racks are located off to the sides.
There were modified designs of this medieval style which presented some open sides also. These forges often had a rear wall and a pillar of stone or brick at the front of each side upon which the hood was supported. This allowed access both to the front of the forge for normal small or short bars, and long bars could be placed through the sides so to heat the middle of those longer bars while the ends of the bars extended clear out both sides of the forge. There are lots of woodcut drawings of medieval style enclosed forges in old manuscripts including De Re Metallica by Georgius Agricola ISBN 0-486-60006-8, and also Diderot's Pictorial Encyclopedia of Trades and Industry ISBN 0-486-27428-4 and 0-486-27429-2. For more info on these books see the Books page on the Links and Resources area of this web site.
 The
most notable differences between the old medieval enclosed forges and the modern
styles is size. While the medieval style is a massive structure owing to its
masonry or stone construction, the modern style tends to be smallish and built
much lighter out of steel. At left is the first photo I submit for this
discussion. There are as many styles of enclosed forges as there are smiths who
build them.
The
most notable differences between the old medieval enclosed forges and the modern
styles is size. While the medieval style is a massive structure owing to its
masonry or stone construction, the modern style tends to be smallish and built
much lighter out of steel. At left is the first photo I submit for this
discussion. There are as many styles of enclosed forges as there are smiths who
build them.
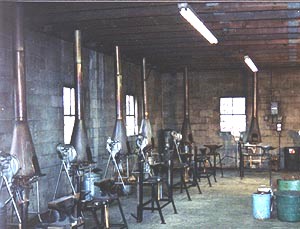
At left are the forges we used when I attended Midwest Horseshoeing School in
Macomb Illinois in 1983. These are small enclosed forges just large enough to
admit the length of a straight bar of steel to be heated in its center, for
forging into horseshoes. Some of the shoes for the draft horses were made from
bars of about 18 inches or more. A 6 inch pipe chimney flue was used on these
forges and the hood completely enclosed the fire with only a small access door to
get into the fire. A Champion 400 hand-cranked blower supplies air to each forge.
These forges where placed rather high, the hearth being level with the smiths
stomach. This was comfortable placement since the small door would have made using
the fire difficult at a lower placement and only small light bars were heated in
these forges for
 making
horseshoes.
making
horseshoes.
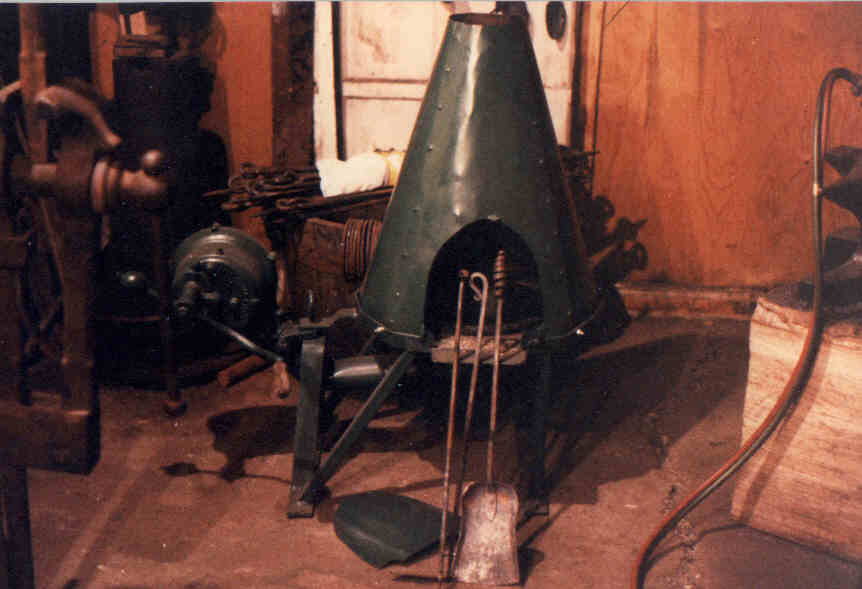
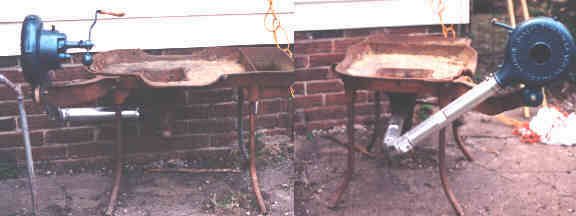
Pictured at right is my old horse shoeing forge which I fabricated out of steel angle iron, sheet metal, and assorted pieces of steel. It had a small but very high quality blower picked up at an engine show, and a Centaur Forge round horseshoer's firepot. A small door could be installed after work was finished but normally left off during use. This forge used a 6 inch pipe chimney and stands about 4 feet tall. It was low enough to be set in the back of a pickup truck for use. It was also set up on a stand for shop use. This forge was stolen around 1988 or I would have photos of this forge in use.
These small forges are typical of the coal forges used in horse shoeing schools and used by professional horseshoer's who worked in a permanent or semi-permanent shop such as the shoeing shacks on racetracks. They can be used for forge welding clips on shoes and other small work such as tongs making for light tongs.
These small forges are used for small items only. Larger forgings such as scrolls used in driveway gates and large railings could not be moved in and out of the small access door to be placed in the fire. Large machinery parts cannot be placed in the fire either for the same reason. These forges were made for small work, knife making, and horseshoeing. They take up little room and are very portable and light in weight. They require no setup time other than to move them into and out of a truck. Or just placed on a bench or stand at a convenient height for work.
Below is a YouTube video showing small enclosed horseshoers' forges heating shoes at the Midwest Horseshoeing School. If you liked the small enclosed coal forges in the photos above, here is an opportunity to see them actually being used to heat the iron. Midwest Horseshoeing School has a new owner and a new building, located near Springfield, Illinois. This is a great video for anyone that is interested in blacksmithing and the art of horseshoeing. For those noticed the close resemblance of the small green forge in the photo above, the answer is yes, I did base the design of my small horseshoeing forge on the forges that are seen in this video. I attended this horseshoeing school in 1983 - when the school was still located in Macomb, Illinois. This is a really nice professionally made video showing small enclosed horseshoeing forges heating horseshoes. The video also introduces the viewer to making horseshoes, anatomy of the horse's foot, recent history and shoeing fads of the horseshoeing trade, styles and types of horseshoes. See how a horse's foot trimmed for shoeing, and also how the shoe is nailed on the horse's foot. Interviews include the new instructor - Steve Hedges, the previous instructor - Roy Evans, and some of the horseshoeing students. This is a great video! Check it out.
 Hoodless
or sidedraft forges
Hoodless
or sidedraft forgesAlso known as side-draft forges because the smoke will bend side ways to enter the draft up the chimney, the hoodless style forge actually needs no large hood to remove smoke from the shop. However some hoodless forges will have a small hood or corbelled masonry extending over the fire slightly to help guide smoke into the chimney. The absence of a large hood over the fire is what gives the hoodless forge its name.
The principle of the hoodless forge is simple. Hot air (and smoke from the
fire) is lighter than cool air and will rise. And based on this principle if hot
smoke and gases are introduced in the bottom opening of the chimney it will
continue to rise out the top as long as the opening in the bottom of the chimney
will admit more hot gases to replace the smoke rising out
 the
top. A draft is created at the entrance to the chimney which pulls more nearby
smoke and hot gases into the chimney.
the
top. A draft is created at the entrance to the chimney which pulls more nearby
smoke and hot gases into the chimney.
Only a light draft is present near the entrance of the chimney and firepots placed about 1 inch from the smoke entrance need no additional hoods to guide smoke into the chimney. If the firepot is built right up against the entrance to the chimney then the lower draft is still strong enough to pull the smoke from an idled fire into the chimney. But some forges use a firepot placement several inches from chimney entrance to allow more room in the fire for larger work, and for these forges the draft into the chimney is just weak enough several inches away from the chimney that some smoke from an idled fire or from sudden use of the fire between heats will escape into the shop. When the fire has been idled for a couple minutes, the heat of additional gases entering the chimney are lower than those normally entering the chimney during a heat, and the velocity of gases moving up the chimney decreases. Consequently the draft into the chimney entrance which pulls more smoke and gases decreases as well. Forges that place the firepot edge a couple inches or more from the chimney entrance will often use a very small sheet metal hood or corbel the masonry of the chimney just over the middle of the fire to help guide smoke into the chimney. For examples of the small sheet metal hoods used on side draft forges see my Steel & Brick page, Anderson Blacksmith Shop, and the Old Sturbridge Blacksmith. For an example of a corbelled brick half hood see the Haverhill Blacksmith Shop.
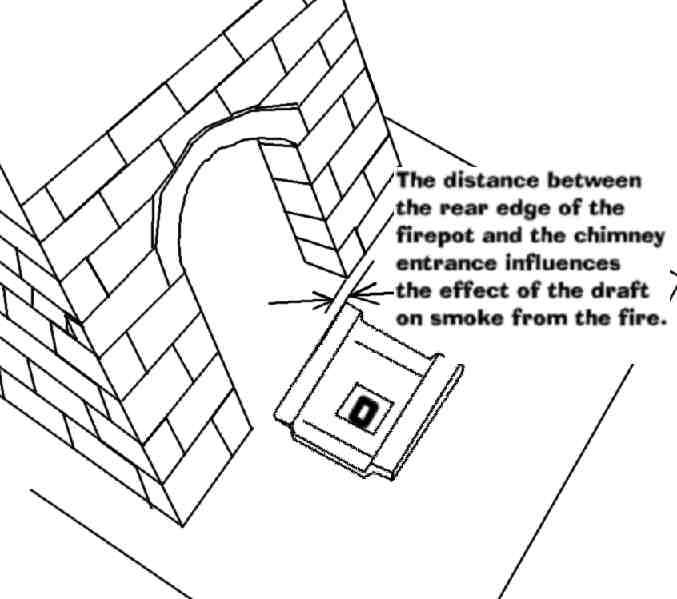 Firepots
measure about roughly 12 x 13 inches, so placing the edge of the firepot within 1
inch of the chimney entrance would bring the center of the fire about 6 or 7
inches from the chimney. For the purpose of this article, the entrance into the
chimney is considered to be level with/or no more than about 2 or 3 inches (the
height of firebricks placed behind the firepot to help build up the fire) above
the level of the firepot. If the smoke entrance is any higher than that, the draft
will weaken as though the firepot had been placed that distance laterally away
from the chimney. I have used a forge in which the entrance the chimney was about
6 inches away from the firepot and that chimney had almost no draft at all. Most
of the smoke from that forge went into the shop.
Firepots
measure about roughly 12 x 13 inches, so placing the edge of the firepot within 1
inch of the chimney entrance would bring the center of the fire about 6 or 7
inches from the chimney. For the purpose of this article, the entrance into the
chimney is considered to be level with/or no more than about 2 or 3 inches (the
height of firebricks placed behind the firepot to help build up the fire) above
the level of the firepot. If the smoke entrance is any higher than that, the draft
will weaken as though the firepot had been placed that distance laterally away
from the chimney. I have used a forge in which the entrance the chimney was about
6 inches away from the firepot and that chimney had almost no draft at all. Most
of the smoke from that forge went into the shop.
Hooded forges - under construction. Much of my material for this page is on
video and will need to be transferred to jpeg format soon.
Ready made forges offer a quick solution to setting up shop with a minimum of effort. These forges are usually self-contained units complete with blower (or bellows) and hearth and firepots if designed for them. They seem like the perfect solution for the beginning smith since all that is needed to get these forges working is to build the fire however, ready made forges do have some disadvantages related to size and design which make them unsatisfactory for some types of work. Factory-made forges do offer a good example for the beginner of what works and what doesn't. They also offer a quick beginning for the new smith. More examples of these types of forges will be added later on this summer.
 Old
cast iron and fabricated forges can still be found at antique auctions, farm
sales, and draft horse sales. Most of these were made in the late 19th and early
20th century for farmers and blacksmiths who needed a forge that was inexpensive
and moved fairly easily. They were usually sold as complete units with blowers
(and sometimes bellows). Some had shallow firepots, some deep firepots, and some
had no firepots. New ready made forges can still be bought from blacksmith
suppliers such as Centaur Forge
(see the Links and Resources page) in Burlington Wisconsin.
Old
cast iron and fabricated forges can still be found at antique auctions, farm
sales, and draft horse sales. Most of these were made in the late 19th and early
20th century for farmers and blacksmiths who needed a forge that was inexpensive
and moved fairly easily. They were usually sold as complete units with blowers
(and sometimes bellows). Some had shallow firepots, some deep firepots, and some
had no firepots. New ready made forges can still be bought from blacksmith
suppliers such as Centaur Forge
(see the Links and Resources page) in Burlington Wisconsin.
 When
buying used at most sales, beware of condition of the forge complete. Many are not
in serviceable or even repairable condition. It is recommended that the beginner
have an experienced smith help them buy at an auction, or even better, to spend a
little more money and buy a working forge from another smith who can show them how
to use it.
When
buying used at most sales, beware of condition of the forge complete. Many are not
in serviceable or even repairable condition. It is recommended that the beginner
have an experienced smith help them buy at an auction, or even better, to spend a
little more money and buy a working forge from another smith who can show them how
to use it.
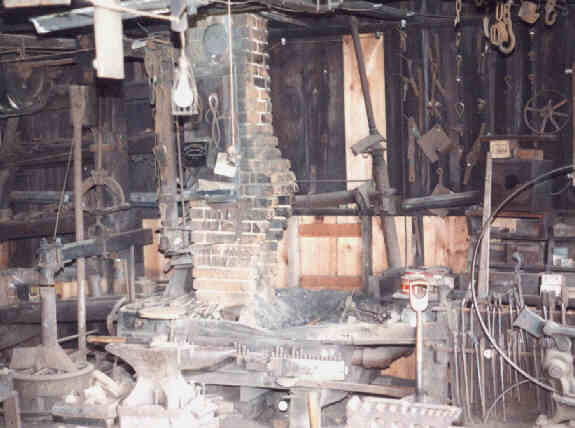
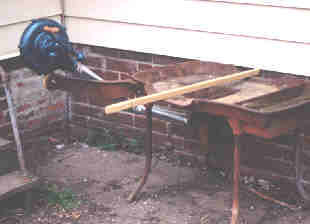
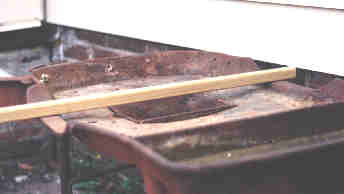
The first forge to be pictured here (above) is my Canedy-Otto blacksmith's forge with a Canedy-Otto Royal Western Chief blower. It is a large cast iron forge with deep firepot similar to the Buffalo Vulcan or Centaur Forge Vulcan firepot. The sides of this forge are about 2-3/4 inches high and the sides are cut out or relieved to allow long bars to be placed through the fire. There were two styles of firepot that were used with this forge. One was shallow at about 2 inches deep, and the other seen in the above photos is the deep pot similar to the Centaur Vulcan at about 5 inches deep. For forging small objects and horseshoeing the above forge combination works great. However when heating long bars that must hang over both sides of the forge, the bar is held up above the firepot by about 2 inches. This requires a larger fire and much higher fuel consumption to heat longer bars.
With the shallow firepot this is no problem since the heart of the fire is raised about 2 inches higher and the bar passes through the heart of the fire while resting on the sides of the hearth. If this point is not understood, then see the page Using the Fire on this web site to get a better grasp on how the heart of the fire influences heating the iron. Bending a bar to allow it to rest in the fire is always unacceptable because doing so makes working the iron more awkward or time consuming to straighten the bar our again before forging each time.
 The
drawing at right is a comparison of a bar being heated in the fire and shows the
effects of having hearth sides that raised the bar above the heart of the fire.
The upper drawing shows tall hearth sides and the long bar rests across on top of
the sides of the hearth- raising the bar far above the heart of the fire. The
lower drawing depicts a bar resting on low hearth edges and placed through the
upper section of the heart of the fire. Clearly the idea is to design a forge that
allows the iron to be placed through the heart of the fire. Many people simply
don't understand this. The bar must be placed through the heart of the fire for
effective and efficient heating or, a larger fire must be built with larger heart
that consumes much more coal.
The
drawing at right is a comparison of a bar being heated in the fire and shows the
effects of having hearth sides that raised the bar above the heart of the fire.
The upper drawing shows tall hearth sides and the long bar rests across on top of
the sides of the hearth- raising the bar far above the heart of the fire. The
lower drawing depicts a bar resting on low hearth edges and placed through the
upper section of the heart of the fire. Clearly the idea is to design a forge that
allows the iron to be placed through the heart of the fire. Many people simply
don't understand this. The bar must be placed through the heart of the fire for
effective and efficient heating or, a larger fire must be built with larger heart
that consumes much more coal.
Conclusion
When buying or building a forge for shop use in which long bars will be heated, low hearth sides or edges are better than tall ones, and no hearth sides above the level of the center of the fire heart are best when using deep firepots such as the Centaur Vulcan or round pots.
Updated September 29, 2019.
Page created January 04, 2004.