 Jacobs
sets the standard for drill chucks.
Jacobs
sets the standard for drill chucks.[Home] [Back to Ye Old Drill] [Camelback Drills] [The Post Drill] [Morse Taper] [Standard No. 2 Chuck] [Westcott's Little Giant Chuck] [Jacobs Chucks] [Restoring Canedy-Otto No. 16]
Jacobs
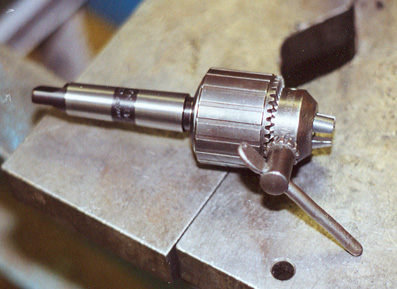
sets the standard for drill chucks.The finest heavy duty drill chucks on the market are made by the Jacobs company. The Jacobs company has been in business for nearly a hundred years. The standard design seen in the photo at left is what all of us associate a good drill chuck to be, and so much so in fact that all of the cheap Asian import companies try to copy the appearance of the Jacobs chucks. Most companies try to produce products for every price range and market and the Jacobs company also sells cheaper quality chucks for those who want them. It is their heavy duty line of drill chucks which set the standard by which all other chucks are judged. And it is the heavy duty chucks to which this page is devoted. These chucks are built so well that they often out-live their owners. Buying one of Jacobs' higher quality chucks can be considered a lifetime investment.
October 10, 2021.
The new Jacobs Chuck website is here: http://www.jacobschuck.com/ .
Much more positive gripping power than provided by keyless chucks and simpler to use. The keyed chucks are the only ones that I use and the only ones worth the time to describe here on this page.
Method of attachment to the drill. There are two ways to mount a drill chuck onto a drill. Either by threading the chuck onto a threaded arbor or spindle, or by driving a taper mounted chuck onto a tapered arbor or spindle. For now only the tapered arbor style mount is described on this page.
The arbor. An arbor is the spindle to which the chuck is fastened. The arbor can be machined onto the end of a drill spindle or it can be a separate small part that can be removed from the drill. Arbors are small spindle shaped shanks that may be tapered for use in MT style sockets on drill presses, or having plain round shanks for use in machine tools. Some cheaper drill presses require the chuck to be mounted directly to the spindle by either threading the chuck onto a threaded spindle end or to a JT taper.
Fix this area
One end of the arbor is turned to a Morse taper for mounting in the socket of the drill press spindle or accessory. The other end is a short plain taper called a Jacobs Taper that is driven into the tapered socket in the end of the chuck body. The JT taper or Jacobs Taper is the most commonly used style of spindle taper for mounting the drill chuck. There are a variety of sizes of JT taper and these are expressed as in number form. Examples of common JT number sizes are #33, #2, #3, #4 etc. The arbor must be forced into the chuck body with much more force than used to set a MT tool in its socket. Friction alone holds the arbor in place despite heavy resistance in drilling.
 Arbors
are available in a large variety of sizes and types. The user will need to
know exactly which type and taper size is used in his/her chuck when ordering new.
In the photo at left is a group of arbors with JT taper chuck ends of various
sizes, and several types and sizes of drill spindle ends. As can be guessed,
arbors are ordered by size of drill chuck body taper, and drill press socket size
and type.
Arbors
are available in a large variety of sizes and types. The user will need to
know exactly which type and taper size is used in his/her chuck when ordering new.
In the photo at left is a group of arbors with JT taper chuck ends of various
sizes, and several types and sizes of drill spindle ends. As can be guessed,
arbors are ordered by size of drill chuck body taper, and drill press socket size
and type.
In the photo (at left) viewed from left to right, a 3JT arbor with a 5/8 straight round shank, a 3JT arbor with 3MT shank, a 2JT arbor with 2MT shank, a 33JT arbor with 2MT shank, a 4JT arbor with a 2MT shank. The chuck is an 18N Jacobs ball bearing Super Chuck with a 4JT mount socket. There are of coarse more types of arbors available. This page describes only the styles of arbors used in the author's shop.


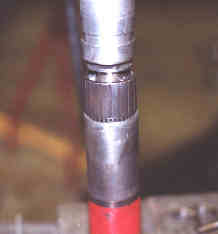
The jaws slide inside a precision drilled set of slots in the chuck body (seen in photo near left). The slots angle inwards towards the front of the drill. Threads are cut on one side of the jaws to allow the jaws to be moved and controlled from outside the chuck. A special tapered-thread nut is machined to engage these jaws at an angle, and the nut forces the jaws to move inward or outward depending on which way it is rotated. The nut is then scored and broken in halves so that it can be installed around the chuck body and jaws during assembly of the chuck. The nut fits inside a special groove running around the center of the chuck body and the groove is deep enough to expose the threaded sides of the jaws which are engaged by the nut. A sleeve fits loosely around the chuck body and is pressed tightly over the split nut. The sleeve holds the halves of the nut together tightly. It is the tight press fit over the split nut which keeps the sleeve in place.
The jaws are a precision fit inside their slots and any dirt or grit or corrosion can interfere with movement of the jaws. Dirt that gets into the jaws from the bit side of the chuck can often be cleaned out by repeated steps of wiping, oiling, working, and wiping again. But dirt that enters the back of the chuck between the back rim and the chuck body can only be removed by disassembling the chuck first.
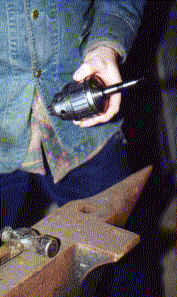
The arbor is first removed by placing the chuck over a suitable support (such as opened jaws of a vise or hardie hole of an anvil). Threaded chucks are unscrewed from the spindle and taper mount chucks can be removed from the drill spindle using special forked wedges that pry against the chuck body and spindle housing. Note that it is not necessary to remove the arbor from the chuck at this time but the arbor will need to be removed at some time before reassembling the chuck later.
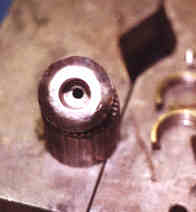
Removing JT type taper arbors from chuck. First clean the inside of the drill chuck to expose the access hole through the inside center of the chuck body (and the end of the arbor should be visible through this hole). The photo (at right) shows the bottom of a chuck, and the access hole is clearly visible inside the chuck body.
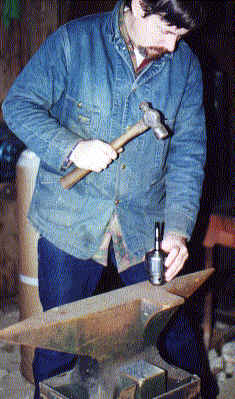
Position the chuck with arbor loosely between the jaws of a vise or over the hardy hole of an anvil. Place a rag or box below the arbor to catch it when it comes out. With the jaws of the chuck full open, place a punch down through the hole inside the center of the chuck and strike sharp blows with a heavy hammer. The chuck arbor will pop out quickly so be sure to catch it so that it doesn't hit a concrete or other hard surface which might damage the tapered ends of the arbor.
Removing a chuck that is permanently mounted to the taper end of a drill spindle.
This section under construction.
 Extend
the jaws of the chuck fully before pressing sleeve off.
Extend
the jaws of the chuck fully before pressing sleeve off.
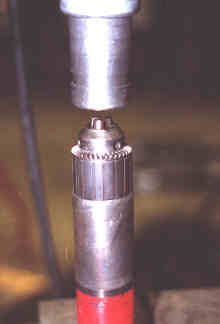
Before pressing, the jaws of the chuck are extended all the way out. The photos are right are incorrect- the jaws should have been extended all the way out and closed. NEVER open the jaws all the way before pressing. Use a hydraulic press to press the chuck through the sleeve. Place the chuck over a short length of pipe that is large enough to support the sleeve, but allows the chuck body to pass freely through the inside of the pipe. The chuck body is pressed down through the pipe. Take care to use only a squarely cut pipe and make sure that no tilting or binding occurs while pressing the chuck out of the sleeve. Once the chuck sleeve is off, the split nut and jaws can then be removed.
Before reassembly the chuck parts are thoroughly cleaned with solvent and a wire brush and rags.
 Look
closely, the jaws are not identical.
Look
closely, the jaws are not identical.
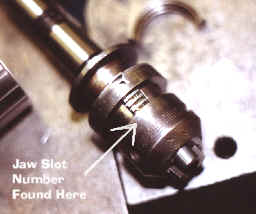
The first thing to be noted during reassembly is that there are numbers (1, 2, or 3) near each jaw slot. These numbers didn't show up in the photos but an arrow in the photo at bottom left points to the area near the jaw slot where the numbers are found. The numbers help the mechanic set up the jaws in the proper order during reassemble. Although any jaw will fit in any slot, the jaws must be in order so that they fit in the threaded area of the split nut. Each jaw is either numbered (the old method) or is machined with a certain profile (new jaw and nut sets) to delineate which jaw to place in each slot. Jaw # 1 has a very small step machined on the thread closest to the jaw end. #2 has a full step machined into the thread near the jaw end and #3 has no step at all near the jaw end. Grease is applied to the jaws and threads before assembly. With the jaws inserted in the correct slots, the ends of the jaws are lined up so that they extend out of or into the chuck equally. The split nut was machined as a single piece and scored and broken in half to allow it to be installed on the chuck. The halves of the split nut are reinstalled and fiddled with until they mesh with the threads of the jaws.
 Again
the jaws are extended before pressing. The sleeve is slipped over the
chuck carefully so that the nut and jaws stay settled in position until the sleeve
can be pressed on. The sleeve is placed upside-down over the same tube used to
remove the sleeve. The chuck body is pressed back down into the chuck. The sleeve
is held in place only by the press-fit contact of the split nut inside the sleeve.
Again
the jaws are extended before pressing. The sleeve is slipped over the
chuck carefully so that the nut and jaws stay settled in position until the sleeve
can be pressed on. The sleeve is placed upside-down over the same tube used to
remove the sleeve. The chuck body is pressed back down into the chuck. The sleeve
is held in place only by the press-fit contact of the split nut inside the sleeve.
It is difficult to describe the proper position of the sleeve when again installed on the chuck, so instead I'll describe some factors the mechanic must weigh to determine proper fit themselves.
 To
install or re-install a chuck arbor, place the chuck upside down on a solid
surface with the jaws retracted. Then place the taper end of the arbor into the
chuck body and drive the arbor tightly into place with a few good sharp blows of a
hammer. The arbor must be tight enough to stay in place but not twist out of the
chuck during heavy resistance in drilling.
To
install or re-install a chuck arbor, place the chuck upside down on a solid
surface with the jaws retracted. Then place the taper end of the arbor into the
chuck body and drive the arbor tightly into place with a few good sharp blows of a
hammer. The arbor must be tight enough to stay in place but not twist out of the
chuck during heavy resistance in drilling.
Do not press arbor into chuck using an arbor press! Using a press to force the arbor into the body is not recommended because a press can force the arbor in excessively tight and cause the body of the chuck to swell and distort and interfere with jaws. Using a hammer limits force and prevents excessive swelling of chuck body. That's right- use a hammer to drive the taper arbor into the chuck.
Stamped on the body of the chuck near the jaws are model numbers, sizes of drill bits the chuck will hold, size and style of arbor taper needed for the chuck, and sometimes even the order number of the repair kit for the chuck. Stamped on the body of good quality chuck keys are the model or models of chucks that the key fits. Quality makes a difference in how long tools last. The better chucks and keys last many years.
New split nut & and jaw sets are available for heavy duty Jacobs chucks as are also new sleeves. It is important that the mechanic has thorough knowledge of both the chuck parts, and Morse Taper theory since the folks who order parts for you may not be familiar enough with them to know what parts are needed.
Replacement parts and tooling.


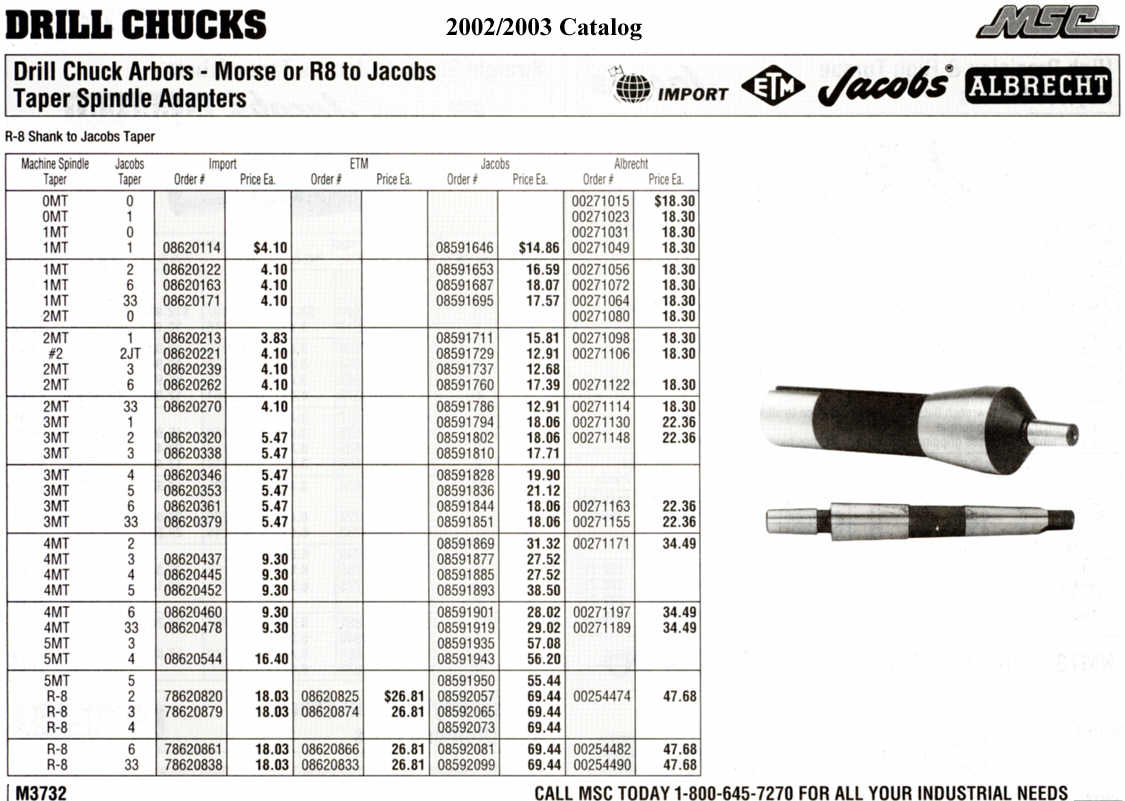

There are several sources to obtain these parts.
MSC Industrial Supply at http://www.mscdirect.com/ and also
McMaster-Carr at http://www.mcmaster.com/
Enco at http://www.use-enco.com/
There are also a large number of small tool and machine vendors that also repair and order parts for drills and other machinery. These are too numerous to include here so check your telephone book.
Obsolete link saved for reference: www.jacobschuck.com/service.html#anchor35680
Latest Update October 10, 2021.
The author can be emailed at address in picture below: